When it comes to complex web forms the onboard TYPO3 content element “Mail form” soon reaches its limits. The well known extension Powermail will fill the gap. Here are some tips and tricks that might come in handy if you start using it.
 These tips apply to Powermail versions starting with 1.6. Older versions differ considerably! Install the extension and take the first steps along the manual.
Don’t forget to add Powermail’s static template to your template record. For a first trial I also recommend to add one of the two CSS templates (“fancy” for modern eye candy, “basic” for the more conservative mind).
JavaScript framework conflicts
Since version 1.6.0 Powermail uses the jQuery JavaScript framework instead of Prototype. Make sure your existing website does not use Prototype for any other purposes as it will conflict with jQuery. If you are using the wide spread Perfect Lightbox extension, make sure you set it up to use jQuery too:
#TS Constants
plugin.perfectlightbox.libraryToUse = jquery
You should definitely check the resulting HTML code of your website to make sure that the busy zoo of extensions in your TYPO3 system does not try to install jQuery multiple times. To do that search the code for all script tags and check what they load.
For my own projects I never rely on any of the built in jQuery versions that come with many extensions. I switch them all off and include the latest jQuery version myself. You can painlessly load it from the Google libraries API using the following TypoScript:
# TS Setup
page.headerData.10 = TEXT
page.headerData.10.value (
  <script src="https://ajax.googleapis.com/ajax/libs/jquery/1.6.2/jquery.min.js" type="text/JavaScript"></script>
)
Multiple script lines can be included between the brackets if you need to add more header lines to load additional JS or CSS files.
To prevent Powermail from loading its own jQuery library use:
# TS Setup
page.includeJSFooterlibs.powermail_jQuery >
And while we are at it…
to prevent Perfect Lightbox from loading its own jQuery library use:
# TS Constants
plugin.perfectlightbox.includeJSLibrarys = 0
Forms with Powermail
After you have managed all the JavaScript hassles you are finally ready to create your first form. Its easy and comfortable – have a look at the manual! The form will usually look nice and clean in the website and will show as a simple list of fieldnames and values in the email that is sent to you (the website owner) and in second email (optional) that is sent as a copy to the visitor of your website who filled in and sent the form. So far so good – if this is what you need, you are done.
But Powermail allows you to apply extreme formating to both the form in the website as well as the emails that are sent out on submission of the form! Have a look:
 Formatting the website form
This is done using CSS rules. Create a copy of the basic or the fancy CSS file that comes with Powermail (see folder EXT:powermail/res/css/) and modify it to your needs. You can include your new CSS file into your HTML header with the headerData property shown above. Don’t forget to remove the static CSS file that we added to your template at the very beginning of this text!
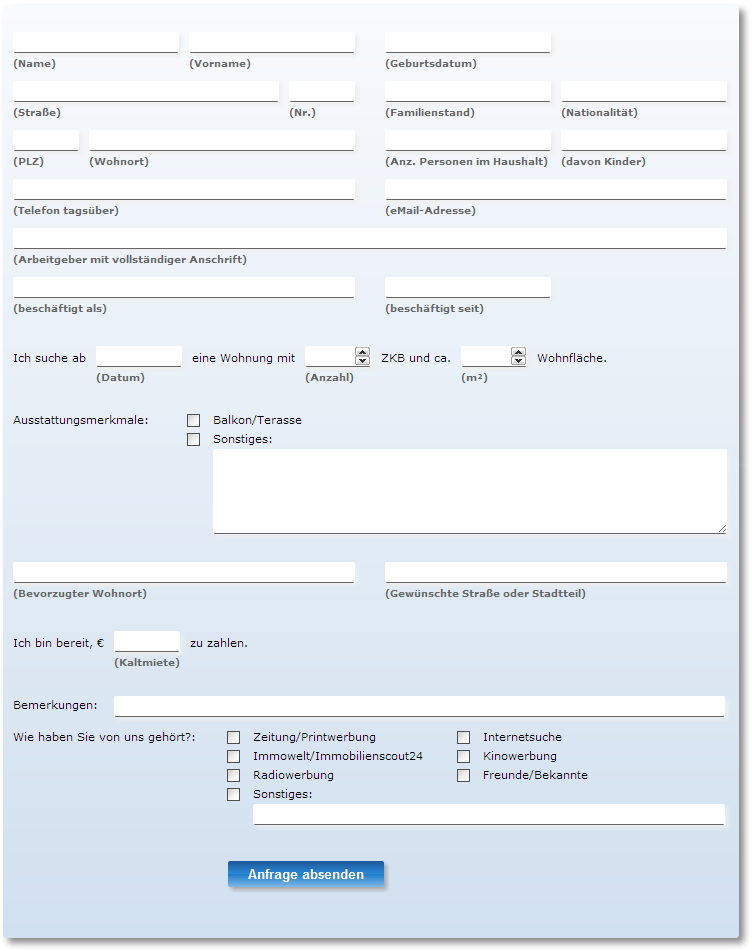
To the right you find an example of a web form that has been formated to mimic its paper counterpart (click to enlarge).
And below is a part of the CSS code that has been used to create that look:
fieldset.tx-powermail-pi1_fieldset .tx_powermail_pi1_fieldwrap_html > label {
	/* label */
	display: block;
	position: relative;
	top: 40px; left: 0px;
	clear: left;
	font-size: 10px;
	font-weight: bold;
	color: #666;
}
div.tx_powermail_pi1_fieldwrap_html {
	/* DIV container arround every field */
	float: left;
	margin: 0 0 1.0em 0;
}
#my_form #powermaildiv_uid01 input{}			/* Name */
#my_form #powermaildiv_uid02 input{ margin-right: 30px; } /* Vorname */
#my_form #powermaildiv_uid03 input{ margin-right: 160px; } /* Geboren */
#my_form #powermaildiv_uid04 input{ width: 260px; }	/* Strasse */
#my_form #powermaildiv_uid05 input{ width:  60px; margin-right: 30px; }	/* Hausnr. */
#my_form #powermaildiv_uid06 input{ }  			/* Familienstand */
#my_form #powermaildiv_uid07 input{ }			/* Nationalität */
Formatting the emails that are sent on submission
 This is done by providing an HTML template with placeholders right in the Powermail plugin instance of your web page (in TYPO3 backend):
Go to the Recipients tab and replace the default content ###POWERMAIL_ALL### with some HTML code that contains placeholders for your fields (e.g . ###UID01### to insert the content of your very first form field). I recommend using the code view of the RTE to have full control over the HTML code. Make sure that you restrict yourself to very simple HTML, as email clients usually only implement a small sub-set of HTML and you normally will not know which clients will be used by the recipients of your emails. For complex email designs don’t hesitate to use invisible tables to structure the content. Although this is last millennium’s technology, it is still the most secure method to ensure that all email clients display your content correctly.
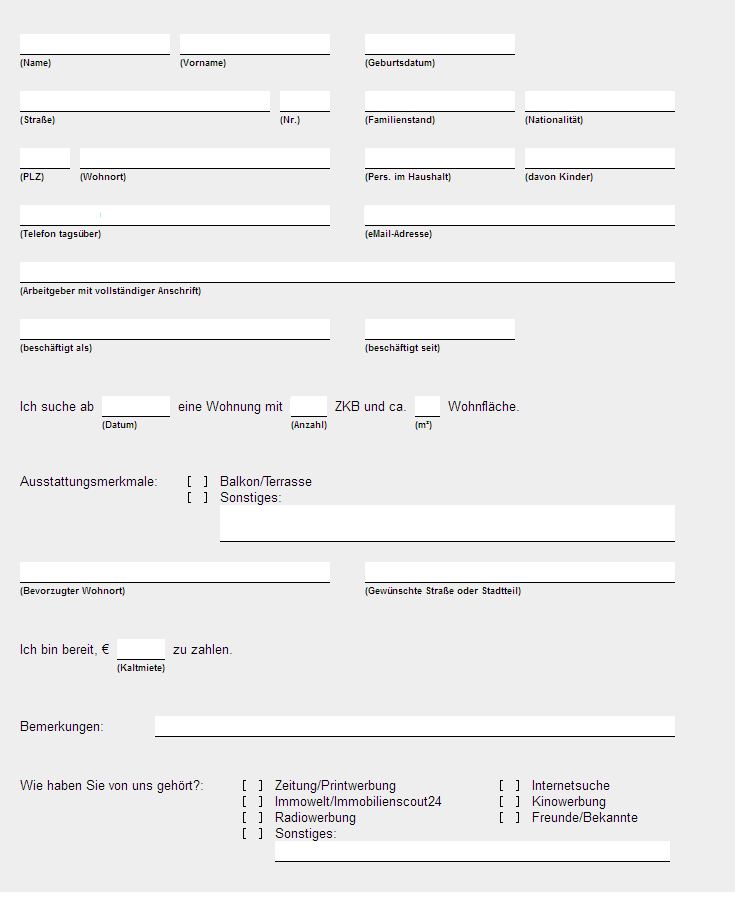
To the right you see an example of how my web form will look when received by email (click to enlarge).
And below is a part of the HTML template code that was used to create that look:
<div style="background-color: #eeeeee; width:695px; padding:20px;">
<table border="0" cellspacing="0" cellpadding="0" style="margin: 10px 0px;">
<tbody>
<tr>
<td width="150" style="border-bottom: 1px solid black; background-color: #ffffff; padding: 2px 0px;">###UID01### </td>
<td width="10" > </td>
<td width="150" style="border-bottom: 1px solid black; background-color: #ffffff; padding: 2px 0px;">###UID02### </td>
<td width="35" > </td>
<td width="150" style="border-bottom: 1px solid black; background-color: #ffffff; padding: 2px 0px;">###UID03### </td>
<td width="10" > </td>
<td width="150" > </td>
</tr>
<tr>
<td style="font-size: 70%; font-weight: bold;">(Name)</td>
<td> </td>
<td style="font-size: 70%; font-weight: bold;">(Vorname)</td>
<td> </td>
<td style="font-size: 70%; font-weight: bold;">(Geburtsdatum)</td>
<td> </td>
<td> </td>
</tr>
</tbody>
</table>
<table border="0" cellspacing="0" cellpadding="0" style="margin: 10px 0px;">
<tbody>
<tr>
<td width="250" style="border-bottom: 1px solid black; background-color: #ffffff; padding: 2px 0px;">###UID04### </td>
<td width="10" > </td>
<td width="50" style="border-bottom: 1px solid black; background-color: #ffffff; padding: 2px 0px;">###UID05### </td>
<td width="35" > </td>
<td width="150" style="border-bottom: 1px solid black; background-color: #ffffff; padding: 2px 0px;">###UID06### </td>
<td width="10" > </td>
<td width="150" style="border-bottom: 1px solid black; background-color: #ffffff; padding: 2px 0px;">###UID07### </td>
</tr>
<tr>
<td style="font-size: 70%; font-weight: bold;">(Straße)</td>
<td> </td>
<td style="font-size: 70%; font-weight: bold;">(Nr.)</td>
<td> </td>
<td style="font-size: 70%; font-weight: bold;">(Familienstand)</td>
<td> </td>
<td style="font-size: 70%; font-weight: bold;">(Nationalität)</td>
</tr>
</tbody>
</table>
...
</div>
If you want to send an identically formatted email to your sender (the person filling the form in your website) you do not have to copy the whole HTML template code into the Sender tab of your plugin instance. Instead simply use the placeholder ###POWERMAIL_EMAILRECIPIENT_RTE### there. It will do the job for you!
Formatting dates
You will find that fields that are set to the date type display a nicely formatted date (according to TYPO3′s locale settings) in your webpage, but show up in the form YYYY-MM-DD in the incoming emails. To correct this use the following code (adapt the formatting rules according to PHP’s strftime syntax):
# TS Constants
plugin.powermail {
	format.datetime = %m/%d/%Y %I:%M %P
	format.date = %m/%d/%Y
}
Set the plain text name of the sender(s)
Both the emails that go to the sender (website visitor) and the recipient (website owner) have different From (= sender email address) attributes. This makes sense. The wired thing is that you define the From-address for the sender’s email in the Recipients tab and the From-address for the recipient’s email in the Sender tab. Well, the logic is probably that this way they can respond to each other.
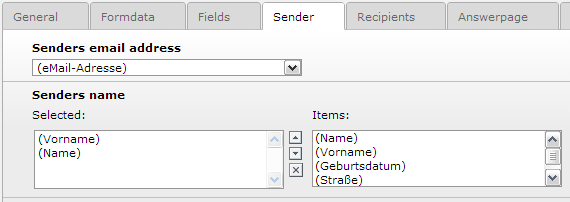
Anyway, you might find that you can easily define the plain text name in the Sender tab –it’s called Senders name and you can assign multiple form fields to it that will be concatenated.
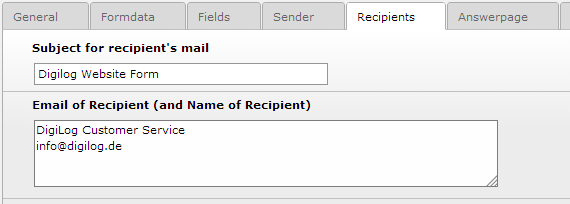
But you will probably have problems to define the plain text name in the Recipients tab. You have to enter it as a first line in the field Email of Recipient (and Name of Recipient), followed by all email addresses of all recipients (line by line). If you do not enter a plain text name in the first line (starting with an email address right away) your visitors will receive email addresses with the plain text name “powermail” which is not very commendable.
Calculating field content with Javascript
With complex forms you will soon want to calculate some field entries using Javascript. Doing a Google search you will probably find many tips to use the additional extension powermail_cond for that purpose. Unfortunately the latest versions of that extension do not offer the option [manualEventHandler] any more, which is needed to add your own JavaScript handlers to the Powermail form fields. You can fall back to the outdated extension fork powermail_cond_jquery which still has that option, but I won’t recommend that as that fork will probably not be maintained any more. Instead there is a much simpler solution:
As jQuery is already part of your installation, you can create the needed Javascript to calculate field content and attach event handlers to the Powermail fields with minimal effort, using the TYPO3 content element “Plain HTML”. Add such an element after your Powermail element and enter the needed Javascript code.
[UPDATE 20120511]: ATTENTION! Do NOT use a Powermail field with field type set to HTML! As multiple comments to this post have shown, Powermail destroys script blocks within such HTML fields. Instead use an independent TYPO3 content element AFTER the Powermail plugin element in your page and set the type of this independent element to “Plain HTML”.
Here are some script examples to fill into the HTML element (don’t forget to adapt to your UIDs!):
Check/uncheck a checkbox if a text input field is filled/emptied
<script type="text/javascript">
/*<![CDATA[*/
  var checkboxID  = "#uid10_3";
  var textfieldID = "#uid20";
  $(textfieldID).change(function(){
    $("checkboxID").prop("checked", $(textfieldID).val().trim()!="");
    // FOR JQUERY < 1.6:  use attr() instead of prop() !!!
  })
/*]]>*/
</script>
ATTENTION:
This is jQuery >= 1.6 code. If you are using older versions you will have to replace the prop() function by the attr() function!
Fill a field with the product of two other fields (C=A*B)
<script type="text/javascript">
/*<![CDATA[*/
  var param1ID = "#uid30";
  var param2ID = "#uid31";
  var resultID = "#uid40";

  // attach change events to parameter fields
  $(param1ID).change(updateResult);
  $(param2ID).change(updateResult);

  function updateResult(){
    $(resultID).val($(param1ID).val()*$(param2ID).val());
  }
/*]]>*/
</script>
Quick hint for powermail_cond users
If you still want to give powermail_cond a try (it can basically switch the visibility of fields and the available options of select boxes, depending on the content of other fields), you may find yourself wondering how to create the rules that are described in the manual. I searched my ass off to find it.
Solution: Use the list module to create new rules records in the page where your Powermail plugin is used. But don’t use the list module to create new conditions records – this is done from within the rules!
Avoiding spam
Last but not least – some remarks about security:
As mentioned in the Powermail manual, it is very advisable to install the extension wt_spamshield which implements a strong multi-layered spam protection that is invisible to the user and requires only minimal configuration effort.
If you don’t do it you risk that your forms are used to send out all kind of spam links!
It can be done by simply entering a faked sender email address and using any of the textarea fields to transport links of a nice bunch of websites that you never wanted to be associated with. If you set up your form to send a copy to the visitor of your website, it can be used with a faked sender address to send to ANYBODY! And the emails will name you as the origin of this trash.
To avoid that risk:
Simply install the extension wt_spamshield, add the static template and add this line of TypoScript:
#TS Setup:
plugin.wt_spamshield.enable.powermail = 1
You can tell that the spamshield if active by looking at the HTML code of your form’s page. You should find a new input field at the very end of the form that has a class attribute class=”tx_powermail_pi1_tastyhoney” attached. This is the honey pot field that is part of one of the layers of spam protection.


Pingback: Powermail 1.6.3 und eigener Code - TYPO3 Forum & Portal
Pingback: Feldinhalt per JavaScript berechnen - TYPO3 Forum & Portal
Great article! We’ve just started using Powermail, and I’m thrilled with it. Do have a question though. We are going to use Powermail with DB Integration – but we want to store the users tables in their own database. Not an issue with DB Integration but I’ve searched and searched and cannot find any information about how insert from Powermail into an external database.
Is this possible? Or is there a way to work with DB Integration to do this (couldn’t find info on that either).
Thanks
Hi Mary,
as you will know Powermail can store incoming form data in arbitrary tables/fields within the TYPO3 database (see Powermail’s dbEntry property). But AFAIK there is no mechanism to store data into any external or third-party database. At least there is no such hint in the documentation.
Wouldn’t it help if you would create your own table within the TYPO3 DB and direct Powermail to use it? What is the reason you want to use another DB?
Cheers, Jörg.
Thanks for responding! The reason for the use of an external database is that our installation is huge – over 50,000 pages (only 20,000 live) and 6000 pages in a separate installation of Typo3. Over 300 departmental sites, lord knows how many templates. So we decided it would be best to put user tables in their own database.
I was doing more research and found in2Code’s site and emailed them. They responded immediately that it wasn’t at this time possible. I asked they add it to their wish list .
I know I can use tables in the Typo3 database, I’m using powermail/db integration on another site that I volunteer for and it works so very well!
So for now we’ll do it internally, we can always export and import data to tables once Powermail can connect to an external db.
Thanks again for responding!
Mary, I think there is a solution for your problem:
Have a look at the extension dbal. It implements a database abstraction layer and was originally written to make TYPO3 work on enterprise level databases like PostgreSQL or Oracle. But it can also be used to map only single tables (and even single fields) of the TYPO3 database to another database!
From the manual:
Sounds like this is exactly what you need, and it will not only work for Powermail but for any other part of TYPO3 or any other extension that you use. An important prerequisite is that your extension makes use of the defined database access methods of TYPO3 and does not try to access the MySQL database with direct PHP commands. But it is safe to assume that this is true for all mature extensions – Powermail being one of them.
Hi sorry I never responded (Mary). My managers solution to this was to tell everyone we are moving to Drupal. now it’s all a huge murkey mess.
But thanks anyway, I have another site in Typo3 that I manage.
My Sourcecode has this output:
<script type=”text/javascript”>
/**/
</sc
Why does this happen?
Can you help?
Frankly, I don’t have any idea. With this little information it is close to impossible to tell what is going wrong and why.
Hi!
You can try to set “RemoveXSS for html fields” (in the powermail constants) to “0″. This worked für me!
Konstantin, I think I found the culprit: You may have used a Powermail field element of field type HTML for your JavaScript code. This will not work. As stated in my posting you must use a separate TYPO3 content element of type “Plain HTML”. Place it AFTER the Powermail plugin element and insert your JavaScript code into that separate element.
I have updated the text of my original article to avoid any misunderstandings.
Hi!
Ich habe evtl. das selbe Problem wie Konstantin. Mein Frontend zeigt mir anstelle eines richtigen Outputs nur
ript type=”text/javascript”> /**/
Wenn ich mir den Quellcode ansehe, stimmt der gar nicht mit dem überein, was ich Typo3 im Backend eingegeben habe.
Aus <script type… wird dort:
<script type=”text/javascript”>
Das führt dazu, dass der Code zerschossen wird Wie kommt denn sowas zustande (passiert im FF und im IE) ? Und vor allem: wie kann man das Problem beheben?
Danke für jede Hilfe!
P.S.: Should I write in English? Your name sounds like a German’s …
Ich habe das Problem dadurch gelöst, dass ich in den Konstanten von Powermail das feld “RemoveXSS for html fields” auf “0″ gesetzt habe.
Jetzt ist der HTMl code wenigstens richtig.
Aber die Rechnung, die ich gern hätte, wird nicht ausgeführt. Müssen die Felder für die einzelnen Werte, die berechnet werden sollen, Textfelder sein oder noch irgendeine bestimme Eigenschaft haben?
LG Maria
Hallo Maria,
ja, Du kannst auf Deutsch posten. Ich führe dieses Blog in Englisch um mehr Leser zu erreichen. Ich habe – wie auch schon bei Konstantin – aufgrund der relativ beschränkten Informationen keine Idee, was auf Deinem System schief läuft. Ich habe Dir aber gerade eine persönliche Email geschrieben, vielleicht kommen wir so weiter.
Viele Grüße, Jörg.
Hallo Maria,
wie’s aussieht, hast Du Deinen JavaScript-Code in ein Powermail-Feld vom Typ HTML geschrieben. Das funktioniert nicht: Powermail zerstört Script-Blöcke in solchen Elementen. Bitte verwende statt dessen ein eigenes TYPO3-Content-Element vom Typ HTML hinter (!) dem Powermail-Plugin-Element. Dort kannst Du Deinen JS-Code einfügen, ohne dass er verändert wird.
Ich habe den Text des Artikels etwas ergänzt, um auf diese Falle hinzuweisen.
Viel Erfolg, Jörg.
Hallo,
ich habe mal eine Frage wegen dem berechnen in powermail. Ich habe jetzt die Version 2.0.2, aber es funktioniert nicht. die Event Handler werden nicht geändert. Habe jetzt zig Varianten ausprobiert. Gibt es da eine Lösung?
Danke im Voraus
Hushy
Hallo Hushy,
kann man sich Dein Problem irgendwo anschauen?
Gruß Jörg.
dein problem wird sein, dass powermail2 jquery im footer einfügt. müsste aber für dieses vorgehen im header sein.
Hi, to exclude powermail built-in jQuery footer inclusion, on Typo3 6.1 & powermail 2.0.7 I had to use:
page = PAGE
page.includeJSFooterlibs.powermailJQuery >
thanks for the tips!! Great article
Hi! Have Typo 4.5.3 installed with powermail 1.6.4 an wt_spamshield 0.9.0. My site has three forms created with powermail. Only on one form I see wt_spamshield working (the honeypod field is there and spam is stopped). But I cannot make wt_spamshield work on the other forms.
I have tried to Add the TypoScript (plugin.wt_spamshield.enable.powermail = 1) in the main template and in the page (Seiteneigenschaften – Ressourcen). Cashes have been cleared.
Have not installed conflicting extensions like mf_akismet or wt_calculating_captcha, not even ve_guestbook. The forms are exactly the same (of course UIDs vary and the receiver is different). Have no idea what to do.
An update to TYPO 4.6 and powermail 2.0 is not possible right now. Anyone with a hint? Thank you so much!
Phiba, solving such problems is beyond the scope of this blog posting. You should ask them in dedicated forums, the TYPO3 mailing lists or (my preferred option) on StackOverflow.
As a first and quick test I would use the TypoScript Object Browser, to analyze the TS setup of the page that is not working. Are all parameters needed by wt_spamshield set correctly? Also check whether the static templates for wt_spamshield are included in that page. But please let us not continue this discussion here.
Thank you very much Jörg. I am sorry to have stretched too far with my question…
But your few lines helped me to solve the problem. Looking in the TypoScript Object browser I saw that the value for ‘plugin.wt_spamshield.enable.powermail’ was still set to 0. So I changed it and now all forms work well. Still don’t have an explanation for all of this. But the main thing, a massive assault of spam from China is being blocked now! Thank you again.
Hi, i have Typo3 4.6.2 and powermail extension < 2.
I need to validate a special field, a social security field. What is the best way to do that?
Can you help me?
Thanks in advance and thanks for the ideas!
Sorry, I do not have a system with this combination up and running. You may want to ask your question on StackOverflow.
Ok. Thanks!